Monday, May 31, 2010

Fancy n Free


Supplies Needed

PSP X2 ( any version will work)
Tube of choice or the one I am using Marco Guaglione
you can purchase his work at MPT
Scrap Fancy  Free by JT Designs and can be purchased Here
Font of choice or the one I used: Nhilschiz Handwriting
Drop Shadow of choice.
Mask wsl_16 by Weescotlass Here

Remember to Save Often!!!

Let's begin


Open new image 600 x 600.
Select JTD_FF_Frame4 copy paste, then using Magic Wand click inside frames
Selections Modify Expand by 4.
Select JTD_FF_Paper10 copy paste Selections Invert Delete, move below frame.Don't  Deselect.
Open your tube/s copy paste into frames deselect now, then, move below frame.
Select JTD_FF_Dangle 1copy paste place on left side of frames.
Select JTD_FF_Flower1 copy paste place in center of frames see tag.
Select JTD_FF_Teddy copy paste resize as needed place right side of frame,
Select JTD_FF_Paper2 copy paste Apply mask Merge Merge Group.
Select JTD_FF_Doodle3copy paste resize as needed
then duplicate/flip/mirror then Merge Down.
Add Drop Shadow to all except mask layer

Add your Artist © and your name then crop and save.
This is only a guide and feel free to use any other element you wish.
Most of all have fun creating.
Those that wish to animate please continue.

Animation.

Click into Psp then on Doodle layer Adjust Add/Remove Noise with these settings:
Copy Special/Copy Merged paste into AS as new animation.
Repeat this twice more increasing the noise to 30 then 35.
Save as a Gif and your done.

This tutorial was written by Maree (aka Falcon) on 31 May 2010
Any similarities to this tutorial are purely coincidental
© Maree

Hex on Love


Supplies Needed

PSP X2 ( any version will work)
Tube of chioce or the one I am using the sensational artwork of Ismael Rac
you may purchase his work ArtisticMinds Here
Scrap Hex by Toxic Desirez
and can be purchased at Dazzling Scraps
Font of choice or the one I used: PC Americana
Drop Shadow of choice.
WSL_116 by Weescotslass Here
Remember to Save Often!!!
Let's begin

Open new image 600 x 600.
Open Kristen-Hex-Paper16 copy paste apply mask merge merge group.
Open Kristen-Hex-Ribbon1 copy paste resize then Free Rotate 90 right then Image Mirror.
Open Kristen-Hex-Beaded String 2 copy paste place on left side of ribbon.
Open Kristen-Hex-Heart1 copy paste resize place on right side of ribbon.
Open Kristen-Hex-Charm 2 copy paste resize then place in center.
Select your tube copy paste resize if needed, place.
Open Kristen-Hex-Couldron copy paste place to the left.
Then sing your Freehand selection tool outline the top of the cauldron.
Then go to Effects Eye cnady -Backlight with a Pink color effect, deselect
Open Kristen-Hex-Book & stand copy paste place on right side
Open Kristen-Hex-Cat copy paste resize if needed,
Open Kristen-Hex-Dice copy paste reisze place in front of cat
Open Kristen-Hex-Feathers copy paste resie place in front of cauldron.
Open Kristen-Hex-Lips 2 copy paste above cauldron.

Add your Artist © and your name then crop and save.
This is only a guide and feel free to use any other element you wish.
Most of all have fun creating.

Animation

If you wish to animate please continue.
Select Edit Copy Special-Copy Merged click in AS paste as new animation.
Back in PSP on mask layer lower Opacity to 85 then
copy merge paste in AS After current frame.
Back in PSP return opacity to 100 percent then copy paste in As
Repeat above again lowering opacity to 75. then again at 100 percent,
You now should have 5 layers Ctrl +A then view your animation. Resize if needed.
Save and your done, I hope you enjoyed this tutorial.


This tutorial was written by Maree (aka Falcon) on 31 May 2010
Any similarities to this tutorial are purely coincidental.
© Maree

Welcome Spring


Supplies Needed

PSP X2 ( any version will work)
Tube of chioce or the one I am using the wonderful artwork of Suzannne Woolcott
you will find all her tubes Here
Scrap Welcome Spring by Bello Scarto and can be purchased Here
Font of choice or the one I used:2 Peas Scrumptious
Drop Shadow of choice.
Mask wsl_116 by Weescotslass Here

Remember to Save Often!!!

Let's begin

Open new image 600 x 600.
Open BelloScarto_WelcomeSpring-element 17 cop paste place at left bottom of layer
 then duplicate mirror.
Open BelloScarto_WelcomeSpring-element 28 cop paste resize by 65 percent.
Open BelloScarto_WelcomeSpring-element 14 copy paste in front of tall grass.
Open BelloScarto_WelcomeSpring-element 21 copy paste resize place
 on left side in front of flower
Open BelloScarto_WelcomeSpring-element23 copy paste resie place on right side
Open your tube of choice copy paste resize by 85 percent place in center at bottom of layer.
Open BelloScarto_WelcomeSpring-element 2 copy paste resize by 65 percent place
at top of layer see tag.
Open BelloScarto_WelcomeSpring-element 7 copy paste resize by 50 percent then
 go to Image Free rotate by 28 degrees left
see tag for placement
New raster layer using Flood Fill tool fill with colour #00ffff.
Then apply mask Merge Merge group.
Add your Artist © and your name then crop and save.
This is only a guide and feel free to use any other element you wish.
Most of all have fun creating.
This tutorial was written by Maree (aka Falcon) on 29 May 2010
Any similarities to this tutorial are purely coincidental
© Maree

Tuesday, May 25, 2010

B is 4 Best Friends


Supplies Needed

PSP X2 ( any version will work)
Scrap Just July by CC Creations and can be purchased Here
Font of choice.
Drop Shadow of choice.
Mask by Vix_197 Here

Remember to Save Often!!!


Let's begin

Open new image 650 x 500.
Open Frame 1 copy paste as new layer using your Magic Wand click inside all frames.
Copy paste Paper 9 resize by 68 percent Selections Invert Delete.
Copy Bee. Bee 2 and LadyBUG 2 Paste in Selection move paper and tubes below frame.
X out your background layer and merge layers visible.
Copy paste Flamingo place behind frame layer.
Copy paste Mum1 then duplicate place behind frame see tag.
Copy paste Butter_Flourish resize paste above flower.
Copy paste Cloud and place above frame,
Copy paste beaded_string_tag resize and place on right top corner of frame.
New layer selections select all copy Paper 1 then paste into selection
Deselect then apply mask Merge Merge Group.
Apply Drop Shadow to all except mask layer.
Add your Artist © and your name then crop and save.
This is only a guide and feel free to use any other element you wish.
Most of all have fun creating.

This tutorial was written by Maree (aka Falcon) on 25 May 2010
Any similarites to this tutorial are purely coincidental

© Maree

June is Garv Delites


Supplies Needed

PSP X2 any version will work
Tube/s of choice or the one I am using the artwork of Keith Garvey
and you can purchase tubes at MPT
Scrap Julie's June by JTs Designs and can be purchased    Here 
Font of choice.
Drop Shadow of choice.

Remember to Save Often!!!

Let's begin

Open new image 600 x 600.
Using Preset tool Rectangle draw out a rectangle then
open JTD_JJ_paper 7 cop paste into selection. deselect.
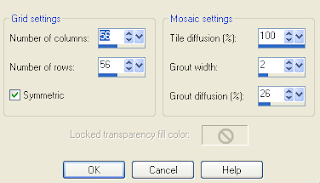
Effects Textured Effects use Mosaic Antigue with these settings

Open JTD-JJ-Doodle2 copy paste place on top right corner duplicate Image Mirror.
Open JTD-JJ-Curtain copy paste resize if needed then duplicate.
using JTD-JJDoodle 3 copy paste resize then duplicate place above curtain, see tag.
Open JTD_JJ_Stairs copy paste resize if needed place in center see tag.
Using your Selection tool-rectangle white foreground x-out background draw out a small square then
give them a drop shadow 2/2/50/5 then -2/ -2/ 50 /5. Duplicate this 3 times.
Using Magic wand click inside frames and select JTD-JJ-Paper23
copy paste into selection then copy paste JTD_JJ_Heart2 Invert Delete.
Add any other element you wish to use or use the ones I have.
Add your tubes I placed 2 behind curtains and 1 on stairs.
OPen JTD_JJ_Ribbon4 copy paste resize place at bottom of tube, see tag.
Add your Artist © and your name then crop and save.
This is only a guide and feel free to use any other element you wish.
Most of all have fun creating.

This tutorial was written by Maree (aka Falcon) on 25 May 2010
Any similarites to this tutorial are purely coincidental
© Maree

A Day At The Zoo


Supplies Needed

PSP X2 ( any version will work)
Tube of choice or the one I am using the wonderful work of Suzanne Woolcott
you may purchase her tubes Here
Scrap A Day At The Zoo by Joy of Mystic Creations
 and can be purchased Here
Font of choice
Drop Shadow of choice.
Mask_050806 by Vaybs Here

Remember to Save Often!!!

Let's begin

Open new image 600 x 600.
Open MCADATZPaper 11 copy paste. Apply mask Merge Merge group
Open MCADATZBear Print copy paste resize by 75 percent duplicate
Open MCADATZFrame Double copy paste resize by 55 percent using Magic wand click
 inside both frames then
Open MCADATZPaer15 copy paste resize by 55 percent move over frame
Selections Invert Delete, Select none.
Open MCADATZPanda and MCADATZTiger place over frame resize if needed then hit delete,
 move paper and tubes under frame,
Open MCADATZWire Mesh Fence copy paste resize by 75 percent then duplicate.
Open MCADATZDanger Sign Post copy paste resize by 65 percent place on right lower side,
Open MCADATZRocks2 copy paste resize by 39 percent place in front of sign.
Open MCADATZDahlia 01 copy paste resize by 36 percent place in front of sign.
Add your tube and resize if needed.
Open MCADATZGrasses copy paste resize by 65 percent,place at bottom of layer.
Open MCADATZPeacock 02 cop paste resize by 75 percent place on left side of tube.
Give all except your mask a drop shadow.

Add your Artist © and your name then crop and save.
This is only a guide and feel free to use any other element you wish.
Most of all have fun creating.

This tutorial was written by Maree (aka Falcon) on 24May 2010
Any similarites to this tutorial are purely coincidental

© Maree

Friday, May 21, 2010

Forever Green


Supplies Needed

PSP X2 ( any version will work)
Tube of chioce or the one I am using the beautiful artwork of Carrie Hall
and can be purchasedHere
Scrap DewDrop PTU by Lynn and can be purchased  Here 
Font of choice:
Drop Shadow of choice.
Mask WSL_105 Here

Remember to Save Often!!!

Let's begin

Open new image 650 x 700.
Open Dewdrop Frame 1 copy paste resize by75 percent, then using 
Magic Wand click inside frame.
Selections Modify Expand by 4.
Open Dewdrop Paper 8 copy paste resize by 65 percent.
Selections Invert hit Delete, move layer down under frame.
Open Dewdrop ribbon wrap 1 copy paste resize by 45 percent place above frame half way.
Open Dewdrop Leaves 1 copy paste resize  duplicate see tag above.
Open your tube of choice copy paste arrange resize if needed.
Open Dewdrop elements, Flower 1, Flower 5, Flower 9. copy paste resize duplicate and arrange.
Open Dewdrop Heart Pendant copy paste resize by 45 percent place in center of flowers.
Then open Dewdrop Ladybug, Bee and Butterfly 4 copy paste resize if needed then place as above.
Open Dewdrop star copy paste resize by 32 percent place on left side of frame.
Open Dewdrop Paper 4 copy paste above background layer. Apply mask Merge Merge group.
Give all except mask layer a Drop Shadow.
Add your Artist © and your name then crop and save.
This is only a guide and feel free to use any other element you wish.
Most of all have fun creating.

This tutorial was written by Maree (aka Falcon) on 21 May 2010
Any similarities to this tutorial are purely coincidental
© Maree
Thursday, May 20, 2010

Wonabe Rock Chic


Supplies Needed
PSP X2 ( any version will work)
Tube of chioce or the one I am usingby Tyson Madoo
and can be purchased at MPT
Scrap Guitar Star FTU by Addictive Pleasure please visit her site Here
Font of choice.
Drop Shadow of choice.
Mask WSL_74 Here
Remember to Save Often!!!

Let begin
Open new image 600 x 600.
Open frame 4 copy paste resize by 75 percent.
Using Magic Wand click inside of frame Selections Modify Expand by 3
Open Paper3 copy paste resize by 45 percent
Selections Invert Delete, move below frame.
Open wire 2 copy paste resize by 39 percent place at top of frame.
Open Chain 2 copy paste resize by 65 percent then
place on Gold section of frame, see tag.
Open Chain 3 copy paste resize by 45 percent see tag above for placement.
Open bow 2 copy paste resize by 29 percent and place in center of wire.
Open guitarpick cop paste resize by 50 percent then
 place on right side of frame.
Open your tube copy paste and place off to the left of frame.
Open Musicnotes 2 copy paste resize by 75 percent.
Duplicate Image Mirror Flip so they are showing notes at top and bottom corners.
Click your paper layer then Effects Illumination Effects Sunburst using these settings.
Repeat this again
Open Paper5 copy paste Apply mask Merge Merge Group.
Add a Drop Shadow to all except mask.
Add your Artist © and your name then crop and save.
This is only a guide and feel free to use any other element you wish.
Most of all have fun creating.

This tutorial was written by Maree (aka Falcon) on 20 May 2010
Any similarities to this tutorial are purely coincidental
© Maree

Wednesday, May 19, 2010

In the Groove.


Supplies Needed

PSP X2 ( any version will work)
Scrap Sassy by Jens Sweet Temptations and can be purchased  Here
Font of choice
Drop Shadow of choice.

Remember to Save Often!!!
Let begin

Open new image 600 x 600.

Open Flower 3_Sassy_JST copy paste resize y 50 percent,
Effects Muirmisters Copies using these settings.

Open Flower 2_Sassy_JST and repeat step as above.Then go to
Adjust Blur Radial Blur with these settings

Click on Preset Tool Select rectangle with these settings.

 Draw out a narrow rectangle then layers convert to raster layer.
 Effects 3D Effects Drop Shadow 2 / 2 / 50 / 5,
then repeat but change to -2/-2/ 50 /5 to give a solid look to frame.Duplicate layer
Using your Magic Wand click inside Selections Modify Expand by 3 then,
Open Paper2_Sassy_JST copy paste resize by 65 percent
 position over frame Selections Invert Delete.
Repeat for other frame.Move layer below frame.
Open Flower13_Sassy_JST copy paste resize by 65 percent duplicate then place in frames.
Open Flower12_Sassy_JST copy paste resize by 75 percent and lace in from of other flower.
Open Bow1_Sassy_JST copy paste resize to fit and place at bottom of frame see tag.
Open Ribbon7_Sassy_JST copy paste resize by 45 percent and
 place in center at top of flower swirls.
Add your tube of choice. I used the Posers sm_delerium 1 - 3 & 5
copy paste and position. Resize if needed.
I added the Tiara_Sassy_JST to my middle Poser sm_delerium 5
Give them all a  Drop Shadow of choice except Radial Blur layer.
Add your Artist © and your name then crop and save.
This is only a guide and feel free to use any other element you wish.
Most of all have fun creating.

This tutorial was written by Maree (aka Falcon) on 19 May 2010
Any similarites to this tutorial are purely coincidental
© Maree

Monday, May 17, 2010

Loving Summer


Supplies Needed

PSP X2 ( any version will work)
Tubes of choice or the one I am using the artwork of Jamie Kidd
and can be purchased at  CILM
Scrap Summer Beauty PTU  by JT's Designs and can be purchased Here
Font of choice
Drop Shadow of choice.
Masks WSL_148 and WSL_228 Here

Remember to Save Often!!!

Let begin

Open new image 600 x 600.white background. Layers new layer Selections select all
Open JT_SummerBeauty Paper 15 copy paste into selection
 apply mask merge merge group.
Select 3 tubes then copy paste and place at bottom edge of mask see tag above.
Open JT_SummerBeauty Umbrellas 3 & 4 copy paste
behind your tubes resize to fit.
Open JT_SummerBeauty Hanger copy paste resize then duplicate
place at top of mask either side,
Open JT_SummerBeauty Fish 1,2 & 3 copy paste resize to fit then place
behind tubes so they look as though they peeking out.
Open JT_SummerBeauty SurfBoard copy paste resize
Image Free Rotate left 90 degrees place in front of tubes at bottom.
Open JT_SummerBeauty Sunglasses 1 copy paste resize by 30 percent place near
 surfboard then using free rotate left 35 degrees
Open JT_SummerBeauty Sun copy paste resize by 28 percent place
 above tubes in center of layer
Open JT_SummerBeauty BeachBall 2 copy paste resize by 25 percent
then place on left side of surfboard.
Open JT_GlitterDoodle 3 copy paste below mask layer then resize
 duplicate mirror move to top of mask.
New raster layer above backgrund layer Selections select all then
Open JT_SummerBeauty Paper 4 copy paste into selection select none.
 Apply your mask merge merge group
Add your Artist © and your name then crop and save.
This is only a guide and feel free to use any other element you wish.
Most of all have fun creating.

This tutorial was written by Maree (aka Falcon) on 16 May 2010
Any similarities to this tutorial are purely coincidental

© Maree

Shabby or Chic


Supplies Needed

PSP X2 ( any version will work)
Tube of chioce or the one I am using the artwork of Elias Chatzoudis
you can purchase the artwork at  MPT
Scrap Not to Shabby PTU by Brandie Eye Candies and
can be purchased Here
Font of choice.
Drop Shadow of choice.
Mask WSL_84 Here

Remember to Save Often!!!

Let begin

Open new image 600 x 600.
Open BEC_NTS_Frame 4 copy paste then resize
.Using Magic Wand click inside both frames then,
Open BEC_NTS_PP 9 copy paste resize by 65 percent place over window frame
Selections Invert Delete then move below frame, deselect
Open BEC_NTS_Ruffles 1 copy paste resize by 65 percent and place at top of window,
Open BEC_NTS_Dangle 1 copy paste resize 50 percent twice
place on side of window see tag.
Open BEC_NTS_Bow 3 copy paste resize by 35 percent place at top of dangle l.
Open BEC_NTS_Butterfly 1 copy paste resize by 30 percent
place in right side window.
Open BEC_NTS_Clock copy paste resize by 35 percent
then place on left top side.
Open BEC_NTS_Sofa coy paste resize by 45 percent place in front of window.
Open BEC_NTS_Tag 1 copy paste resize by 36 percent 
 place in front of lounge.
Open your tube copy paste resize if needed and place tube on tag, see above.
Open BEC_NTS_Flower 3 copy paste resize by 23 percent and
place on left side of tag.
New raster layer above background layer -Selections select all then
Open BEC_NTS_PP 10 copy paste into selection deselect.
Then apply mask merge merge group.

Add your Artist © and your name then crop and save.
This is only a guide and feel free to use any other element you wish.
Most of all have fun creating.

This tutorial was written by Maree (aka Falcon) on 16 May 2010
Any similarities to this tutorial are purely coincidental

© Maree

Friday, May 14, 2010

Blue Babe


Supplies Needed
PSP X2 ( any version will work)
Tube of choice or the one I am using Jamie Kidd and
you may find this wonderful artwork at CILM
Scrap Polar Ice-FTU-by Lynne at Scrapping Emporium
Here
Font of choice 
Drop Shadow of choice.
Mask by Vix_215 Here

Remember to Save Often!!!


Let's begin

Open new image 600 x 600.
Open POLAR ICE FRAME 2 copy paste resize then
using Magic Wand click inside of circle then Selections Modify Expand by 3,
Open POLAR ICE PAPER 10 copy paste selections Invert Delete Select none.
Open your tube copy paste and erase bottom of tube, see tag.
Open POLAR ICE CUTE HEART 1 copy paste duplicate
then resize 2nd layer by 35 percent.
Open POLAR ICE CUTE HEART 2 copy paste resize and place
between the other heart layers.
Open POLAR ICE BLOSSOM copy paste resize by 40 percent duplicate.
Open POLAR ICE ROSES copy paste resize by 40 percent
place above blossom layers.
Open POLAR ICE BOW 3 copy paste resize by 25 percent and
place in center of flowers.
Open POLAR ICE BUTTERFLY 4 copy paste resize by 23 percent and
place on right lower side of your tube
Open POLAR ICE PAPER 4 copy paste above background layer.
Apply mask merge merge group.
Add a Drop Shadow to all except mask layer.

Add your Artist © and your name then crop and save.
This is only a guide and feel free to use any other element you wish.
Most of all have fun creating.

This tutorial was written by Maree (aka Falcon) on 16 May 2010
Any similarities to this tutorial are purely coincidental

© Maree

Sweet or What?


Supplies Needed
PSP X2 ( any version will work)
Tube of chioce or the one I am using the art work of Ismael Rac
and can be purchaded  Here.
Scrap Blackberry by Lynne and can be purchased  Here
Font of choice 
Drop Shadow of choice.
Mask WSL_246  Here
Remember to Save Often!!!


Let begin
Open new image 600 x 600.
Open Blackberry Frame 1 copy paste resize using Magic Wand click inside frame
 and hold down shift key click inside of corners.
Selections Modify Expand by 4.
Open Blackberry Paper 4 copy paste resize by 75 percent
Selelction Invert Delete.Move below frame.
Open your tube copy paste resize if you wish then hit delete.
 Now deselect.Move below frame.
Click eye on background layer, then merge visible.
Move frame to left side of layer.Open your background layer again.
Open your 2nd tube copy paste and see tag for placement.
Open Blackberry Balloon 3 copy paste resize and place on right side of frame.
Open Blackberry Balloons cop paste resize by 55 percent and place on right side
Open Blackberry Flowers 2 copy paste resie place in front of balloons.
Open Blackberry Padlock copy paste resize by 35 percent
 place on left top side of frame.
Open Blackberry Pendant 2 copy paste resize by 30 percent and
place top left side of frame.
Open Blackberry Flower Deco 2 copy paste resize by 22 percent
place on lower left die of frame.
Open Blackberry Cupcake copy paste duplicate resize one by 45 percent
and 2 by 35 percent see tag for placement.
Open Blackberry Sachet copy paste resize by 22 percent
 duplicate see tag for placement.
Open Blackberry Flower copy paste resize by 32 percent
 duplicate place either side of cake.
Open Blackberry Spider copy paste resize by 20 percent
and place above balloon layer.
New layer above background.
Open Blackberry Paper 9 copy paste apply mask, merge merge group.
Give all a Drop Shadow of choice.
Add your Artist © and your name then crop and save.
This is only a guide and feel free to use any other element you wish.
Most of all have fun creating.

This tutorial was written by Maree (aka Falcon) on 15 May 2010
Any similarities to this tutorial are purely coincidental
© Maree

Monday, May 10, 2010

Summer Fairy


Supplies Needed

PSP X2 ( any version will work)
Tube of choice or the one I am using the wonderful artwork of Karen Middleton.
You may purchase this tube at  CILM
Scrap Peaches n Cream by Skrapping Magic
 and be purchased Here
Font of choice or the one I used:2Peas Pixie Dust
Drop Shadow of choice.
Mask wsl_345 Here

Remember to Save Often!!!


Let's begin

Open new image 600 x 600 with white background.
Open tish_peaches_cream_poppy paper copy paste as a new layer
apply mask and merge merge group.
Open tish_Peaches_cream_circles paper copy paste resize by 50 percent.
Open tish_Peaches_cream_daisy_doodle cop paste
 resize by 50 prcent duplicate mirror flip.
Open tish_Peaches_cream_strings paper copy paste resize by 45 percent.
Open tish_Peaches_cream_border paper copy paste resize by 40 percent.
Open tish_Peaches_cream_clothes_pin copy paste resize by 50 percent
 move to right side abot half way down.
Open tish_Peaches_cream_book cop paste resize by 50 percent
then Image Free Rotate 25 degrees left.
Open your tube copy pste position on left side.

Add your Artist © and your name then crop and save.If you do not with to animate.
This is only a guide and feel free to use any other element you wish.
Most of all have fun creating.

If you wish to continue we now are going to animate the wings.

Animation

Using your Freehand Selection tool outline the wings.
Then using Add/Remove Noise Add Noise with these settings:


Selection select none.
Then go to Edit copy special copy merged click into AS paste as a new animation.
Repeat these steps again and by clicking on the undo button twice then go add noise again
with these setting to 35 for the 2nd layer then 40 on the 3rd layer.
save as a gif and we are done.

This tutorial was written by Maree (aka Falcon) on 9 May 2010
Any similarities to this tutorial are purely coincidental
© Maree

Dare To Be Different


Supplies needed

PSP X2 ( any version will work)
Tube of chioce or the one I am using the fantastic artwork of Keith Garvey
you may purchase his tube at MPT
Scrap Slave For You  - PTU by Addictive Pleasures
 and can be purchased  Here
Font of choice or the one I used: Alfredo's Dance and TheNautiGal
Drop Shadow of choice.
Mask by WSL_354

Remember to Save Often!!!


Let's begin

Open new image 700 x 700
New layer using your Selection tool draw out a large circle.
Open paper 10 copy paste into selection, deselect
Now using your preset shape tool ellispe draw out a cirlc around the cirlce layer.
 Do not convert.
Click text tool using Alfreda's Dance font
type these words "Dare To Be Different"
 or use something of your own.
Now click the plus sign on this layer and close out the circle layer
 now we can convert to raster.
Open chain2 copy paste resize to fit place above circle layer.
Open your tube copy paste.
Open whip copy paste resize place handle above her hand
 then carefully using your eraser brush erase till her hand appears.
Open collar copy paste resize see tag for placement, then using your eraser brush
erase part of the leg till you see the word slave appear.
Open bow copy paste resize and place at bottom of circle.
Open corset2, star,mask, and hadcuffs2 copy paste resize
 and place around to you feel happy with your placement.
Open case copy paste resize and place on right side at bottom.
Now give all a Drop Shadow of choice

Add your Artist © abd name then crop and save.
This is only a guide and feel free to use any other element you wish.
Most of all have fun creating.

This tutorial was written by Maree (aka Falcon) on 9 May 2010
Any similarities to this tutorial are purely coincidental
© Maree

Tuesday, May 4, 2010

Fallen Angel


Supplies Needed

PSP X2 ( any version will work)
Tube of choice or the one I am using by Anna Marine and can be
purchased at CILM
Scrap Easter Dawn PTU by Tootypup and 
 this can be purchased  Here
Font of choice or the one I used: Valeria Script One
Mask_186 by Vix Here
Drop Shadow of choice.
Remember to Save Often!!!

Lets begin

Open new image 600 x 600.
Open tp-paper 4 copy paste apply mask merge merge group.
With your Selection Tool select Octagon then draw out for a large octagon.
Open tp-paper3 copy paste into selection, deselect.
Open tp-fern1 copy paste resize then duplicate mirror.Move to edge of mask. Repeat this again.
Open tp- vine 1 copy paste resize then duplicate mirror.
Open tp-lilly1 copy paste duplicate twice, rename l1, L2 ,L3. Now place L1 & L3 above the deco layer,
then move L2 below deco layer.
Open tp-branch 2 copy paste resize duplicate place at top of mask layer, see tag for placement.
Open your tube cop paste trim as needed.
Open tp-deco5 copy paste below mask layer duplicate, see tag above for placement.
Open tp-butterfly 4 & 7 copy paste resize as needed then place one each on both sides.
Give all except your mask a light Drop Shadow.
Add your Artist © add your name then crop and save.
This is only a guide and feel free to use any other element you wish.
Most of all have fun creating.

This tutorial was written by Maree (aka Falcon) on 4 May 2010
Any similarities to this tutorial are purely coincidental
© Maree

Sunday, May 2, 2010

Fairy Dreaming


Supplies needed

PSP X2 ( any version will work)
Tube/s of choice or the one I am using the wonderful artwork of Selina Fenech
you can purchase this at  CILM
Scrap Neopolitan Sorbet by Baby Cake Scraps and
can be purchased  Here.
Font of choice or the one I used: Liorah
Drop Shadow of choice.
Mask 191 by VIX  Here
Remember to Save Often!!!

Let's begin

Open new image 600 x 600.
Open bcs paper eleven copy paste then apply mask merge merge group. Duplicate move around till your happy with position.
Open bcs cluster frame copy paste resize as needed. using magic wand click inside both frames
(hold down the shift key),Selections Modify Expand by 4 then
Open bcs paper thirteen cop paste resize by 50 percent Selections invert Delete, then
Open your tubes copy paste onto frames place then hit delete, Move paper and tubes below frames.
Open bcs fence copy paste resize move below frame.
Open bcs bead swirl copy paste resize place bhind frame see tag for placement.
Open bcs bow flower copy paste resize then duplicate place at each end of fence.
Open bcs beige flower copy paste resize duplicate 3 times place along the fence, see tag.
Open bcs brown flower copy paste resize then duplicate 3 times place as above.
Open bcs pink bfly copy paste resize place in center just above the fence.
Open bcs sparkle trail copy paste resize, duplicate place on either side of frame, see tag.

Add your Artist © and your name then crop and save.
This is only a guide and feel free to use any other element you wish.
Most of all have fun creating.
If you wish to  Animate then please continue.
Animation

Open AS then click back into PsP.
Click on your sparkel trial layer then,
Effects -  Xenofex  Constellation with these settings


Copy Special / Copy Merged click back to AS paste as new animation.
Back to Psp click undo then click on Constellation again then hit Random button.
Back in AS paste after current frame. Repeat this again. You now should have 3 frames.
Crop and Save as a Gif and your done.

This tutorial was written by Maree (aka Falcon) on 2nd May 2010
Any similarities to this tutorial are purely coincidental
© Maree

Unforgetable


Supplies Needed
PSP X2 ( any version will work)
Tube of chioce or the one I am using
Jennifer Jasenko and can be purchased at CILM
Scrap Delia Pink FTU by Tish and can be found  Here
Font of choice or the one I used: Alexbrush
Drop Shadow of choice.
Mask_201 by Vix  Here

Remember to Save Often!!!

Let begin

Open new image 600 x 600.
Open tish_salmon_linen grunge copy paste apply mask merge merge group
Open tish_pink_gold_frame copy paste resize by 85 percent center it.
using your Magic Wand click inside frame Selections Modify Expand by
Open tish_salmon_linen copy paste above frame Selections Invert then hit Delete, move below frame
Open your choice of tube reie if needed then copy paste move over frame till happy with selection,
then hit delete, move below frame.
Open tish_pink_flower copy paste resize by 85 percent duplicate then resize by 90 percent, move both to left side of frame see tag for placement.
Open tish_pink_double_bow copy paste resize by 35 percent place on left side. See tag above.

Add your Artist © and your name then crop and save.
This is only a guide and feel free to use any other element you wish.
Most of all have fun creating.

This tutorial was written by Maree (aka Falcon) on 2nd May 2010
Any similarites to this tutorial are purely coincidental
© Maree

Autumn Splendore


Supplies needed

PSP X2 ( any version will work)
Tube of choice or the one I am using by artist
Suzanne Woolcott and can be purchased Here
Scrap Autumn Splendore PTU by Digi Scrapations
this can be purchased  Here
Font of choice or the one I used:Want You Back
Drop Shadow of Choice

Remember to Save Often!!!
Let begin
Open new image 600 x 600.
Open digiscrapations_slideframe copy paste resize as needed.Using your Magic wand click inside frame
Selections Modify Expand by 4 then,
Open digiscrapations_paper3 copy paste resize by 35 percent or as needed. Selections Invert Delete.Move under frame.
Open digiscrapations_tree copy paste resize by 30 percent and place in center of frame, see tag.
Open your tube copy paste resize as needed place on left side of frame.
Open digiscrapations_falloakleaf copy paste resize duplicate 4 times and see tag for placement.
Open digiscrapations_mapleleaf copy paste resize then duplicate 3 times see tag for placement.
Open digiscrapations_butterfly copy paste resize as needed place inside frame see tag.
Open digiscrapations_wordart3 copy paste resize by 30 percent and place on bottom of frame
Open digiscrapations_flower copy paste resize by 20 percent place on left side of frame, then duplicate mirror, resize by 45 percent.See tag for placement.

Add your Artist © and your name then crop and save.
This is only a guide and feel free to use any other element you wish.
Most of all have fun creating.

This tutorial was written by Maree (aka Falcon) on 2nd May 2010
Any similarities to this tutorial are purely coincidental
© Maree