Click Here her to go to tut♥
Friday, July 30, 2010
Tuesday, July 27, 2010
Saturday, July 24, 2010
Friday, July 23, 2010
Wednesday, July 21, 2010
Rock n A Rolling
Supplies Needed
Tube of choice. I am using the tube that is included in scrap kit
Scrap At The Hop by Digicats at The Creativity Box
Font: Tingle Institute
Drop Shadow of choice.
Mask_364 by Weescotlass
Please visit here for her latest creations
Remember to Save Often!!!
Let's begin
Open new image 650 x 650.
New layer Selections select all copy paste DCD_ATH_Paper05 into Selection. Deselect.
Apply mask merge group.
Select DEC_ATH_Jukebox02 copy paste resize place right side.
Select DEC_ATH_Caddy03 copy pste resize then place on left side
Select DEC_ATH_WA_Rockn copy paste reisze
by 45 percent place top right corner.
Select DEC_ATH_Soda Table copy paste resiz
e by 55 percent place on bottom left side.
Select DEC_ATH_Shake02 copy paste resize
by 25 percent and place on top of table, see tag.
Select DEC_ATH_Kitty Blact copy paste reisze
by 35 percent and place in front of table.
Open your Digigcatustom 5 or tube of choice.
Copy paste resize if needed and place near jukebox.
Select DEC_ATH_Hanging Dice resize by 45 percent hanging on the wordart
then using your eraser, erase a small section of string
to make it look like its hanging off the wordart.
Select DEC_ATH_Music Element01 copy paste resize
by 75 percent and place top left corner.
Click on your background layer.
Copy paste DEC_ATH_Music Element04 resize
by 75 percent then duplicate, Mirror, flip.Merge down.Rename Musical notes.
Add your Artist © and your name crop and save if you dont wish to animate.
This is only a guide and feel free to use any other element you wish.
Most of all have fun creating.
To Animate tag.
Click on musical notes layer.
2. Edit -copy special- copy merged click in Animation shop
paste as new animation,
3. Back in psp click undo then Add noise this time 40 repeat step 2.
4. In psp click undo and then Add noise this time 45 repeat step 2
This tutorial was written by Maree (aka Falcon) on 20 July 2010.
Any similarities to this tutorial are purely coincidental.
© Maree
Sunday, July 18, 2010
* T's All Ours Boys *
I am using the artwork of Stefano Mazzoti and
can be purchased at CILM
or
Tube/s of chioce
Tube/s of chioce
Scrap A Pirates Life by Nettes NightOwl Works Scrappetizing
Font : Xirwana
Drop Shadow of choice.
Mask _363 by Weescotslass
Remember to Save Often!!!
Let's begin
Open new image 650 x 650.
New layer Selections select all copy nnw priate collab paper 5
paste into selection-deselect.
Apply mask merge group.
Open your tubes and copy paste see tag for place ment.
Select nnw priate collab scene copy paste resize by 45 percent then center it.
Select nnw priate collab skull crossbones copy paste
resize by 35 percent place below map.
Select nnw priate collab treasure and booty elements copy paste resize
both by 55 percent place in fron of your tubes, see tag.
Add your Artist © and your name then crop and save or
if you wish to Animate please continue.
Animation
1. Using your Freehand Selection Tool outline the coins on treasure and the booty.
Adjust - Add/Remove Noise - Add Noise with these settings.
Uniform Noise 30 Monochrome ticked.
2. Deselect then Edit Copy Special - Copy Merged.3. Click into AS
paste as new animation.
3.Back in Psp hit the Undo command button then Repeat 1 and 2
but increase Noise to 35. Pasting into AS After Current frame.
4.Repeat 3 again this time increase Noise to 40.
5.Save as a Gif
This is only a guide and feel free to use any other element you wish.
Most of all have fun creating.
This tutorial was written by Maree (aka Falcon) on 18 July 2010
Any similarities to this tutorial are purely coincidental
© Maree
All things Summer
PSP X2 ( any version will work)
I am using the artwork of Jamie Kidd and can be purchased here
CILM or one of your choice
Scrap Summer Fun in the Sun by Grazy this can be purchased
Font: Lollipop
Drop Shadow of choice.
Mask364 by Weescotslass
Remember to Save Often!!!
Let's begin
Open new image 700 x 700.
Select Summer_fun_in_d-sun Element 59 copy paste resize by 60 percent
Select Summer_fun_in_d-sun Element 43 cop paste
resize by 55 percent.Then Layers Merge Merge down.
Click inside frame with Magic wand Selections Modify -Expand by 4
copy Summer_fun_in_d-sun Paper 9 paste into Selection -deselect.
Move below frame
Add your tube of choice resize if needed.
Select Summer_fun_in_d-sun Element 51 (beach ball) copy paste
under frame resize by 35 percent place off to left side.
Select Summer_fun_in_d-sun Element 21 (ribbon) copy paste
resize by 45 percent duplicate mirror.
Select Summer_fun_in_d-sun Elements 4,6,7,15 (shells) copy paste
resize place around bottom of frame.
New layer Select all copy Summer_fun_in_d-sun Paper 7 then
paste into selection -deselect. Apply your mask.
Give all layers a drop shadow expect mask layer.
Add your Artist © and your name then crop and save.
This is only a guide and feel free to use any other element you wish.
Most of all have fun creating.
This tutorial was written by Maree (aka Falcon) on 17 July 2010
Any similarities to this tutorial are purely coincidental
© Maree
Sunday, July 11, 2010
Xmas In July
PSP X2 ( any version will work)
Tube of chioce or the one I am using by the fabulous Ismael Rac
you can purchase Here
Scrap My Blue Christmas by Wacky Winnie Designz
and can be purchased Here
Font of choice or the one I used:Aranke
Drop Shadow of choice.
Mask wsl_84
Remember to Save Often!!!
Let's begin
Open new image 600 x 600.
Select WWD Garland 2 copy paste resize by 50 percent, using Magic Wand
click inside then using WWDPaper8 copy paste
then Selections Invert then hit delete.
Move paper below frame
Open your tube copy paste position tube
then hit delete, now deselect.
I used the following elements just resize and see tag for placement.
WWDBox1
WWDBox2
WWDTree1
WWDTag1
WWDCandle1
WWDCone2
WWDcanyCane1
New layer then select WWD Paper 20 copy paste in Selection - deselect,
then apply mask merge merge group.
Add your Artist © and your name then crop and save.
This is only a guide and feel free to use any other element you wish.
Most of all have fun creating.
This tutorial was written by Maree (aka Falcon) on 11 July 2010
Any similarities to this tutorial are purely coincidental
© Maree
You Can Leave Your Hat On !!!!
PSP X2 ( any version will work)
Tube of chioce or the one I am using by Eugene Rzhevskii and be purchased at MPT
Scrap Tuscany by Lynne of Scrappin Emporium and can be purchased Here
Font of choice or the one I used: Aranke
Drop Shadow of choice.
Mask wsl_84 Here
Remember to Save Often!!!
Let's begin
Open new image 600 x 600.
Select Tuscany paper 5 minimize paper then open Material palette - Pattern
and find paper we will use this for the background set Foreground to Black.
Using your Preset Tool Ellipse draw out a circle with these settings.
Using Magic Wand click in center then Open your tube copy paste
Selections Invert Delete, deselect.
Open Tucany Deco copy paste resize by 50 percent then duplicate
move around till your happy with placement, or see tag.
Add your tube now and place to the right. Resize if needed.
Open Tuscany Heart copy paste resize by 45 percent the place on left side.
Open Tuscany Cowboy hat copy paste resize by 35 percent then
Image Mirror and slightly angle the hat, using the Move Tool.
Open Preset tool then find the Rectangle using the same settings as before,
In your background palate find the Mulit Brown Gradient
Angle 0 Repeat 0 Style Linear.
New layer draw out a oblong see tag convert to raster
give this a drop shadow of choice.
Open Tuscany Flower 1 copy paste resize by 35 percent place at end of box
then duplicate, Image Mirror.
I added the words "You can leave your hat on!!!!" or
you can choose something else to write.
Add your Artist © and your name then crop and save.
This is only a guide and feel free to use any other element you wish.
Most of all have fun creating.
This tutorial was written by Maree (aka Falcon) on 11 July 2010
Any similarities to this tutorial are purely coincidental
© Maree
Sunday, July 4, 2010
Forgiven But Not Forgotten
Supplies Needed
PSP X2 ( any version will work)
Tube is by Jamie Kidd and be purchased at
CILM or a tube of your choice.
Scrap Tender Moment by Creations Annie and
can be purchased here at Sunflower Scraps Boutique
Font: I used Warning
Drop Shadow of choice.
Weescotslass Mask 84 Here
Animation Shop
Remember to Save Often!!!
Let's begin
Open new image 600 x 600.
Select CA_Paper 5 copy paste apply mask merge group.
Copy paste CA_Doodle below mask layer duplicate, mirror then flip
see tag for placement.
Copy paste CA+Beaded3 then resize by 65 percent, move up near top of layer.
Then copy paste CA_Jewel resize by 65 percent place in center of Beaded element.
Copy paste your tube move down.
Copy paste CA_cushion2 resize by 75 percent place behind tube, see tag.
Copy paste CA_letter resize by 45 percent then move with your Pick so you can
place it under the tube hand.
Copy paste CA_candle2 resize by 45 percent place near letter.
Open CA_Bow6 copy paste resize by 35 percent place on right bottom of tube.
Open CA+Flower 4 and 8 copy paste resize duplicate both elements then
place in front of bow till happy with arrangement.
Copy paste CA_Bow3 resize by 35 percent place in front of flowers see tag.
Copy paste CA_papillon element resize by 25 percent place top left corner.
Add your Artist © and your name then crop and save if you do not
want to aimate your tag.
This is only a guide and feel free to use any other element you wish.
Most of all have fun creating.
Animation Shop
In psp - Click on Beaded element layer, go to
Adjust-Add/Remove Noise-Add Noise
with these settings Uniform 35 percent,
Edit - Copy Special - Copy Merged.
Click into AS, Paste as new animation,
Repeat this again with the percentage increased by 5 - so this twice.
Save as a Gif.
This tutorial was written by Maree (aka Falcon) on 4 July 2010
Any similarities to this tutorial are purely coincidental
© Maree
Myth or Magic
Supplies Needed
PSP X2 ( any version will work)
Tube of choice or the one I am using
Scrap Myth's and Magic by Athena Designs and can be purchased at Scrappetizing
Font of choice or the one I used: Black Chancey
Drop Shadow of choice.
Mask3 by ButterflybyFlutterby
Remember to Save Often!!!
Supply for star and cat blings, these have come from my forum groups,
if they are yours please let me know so credit can be given to creator/s.
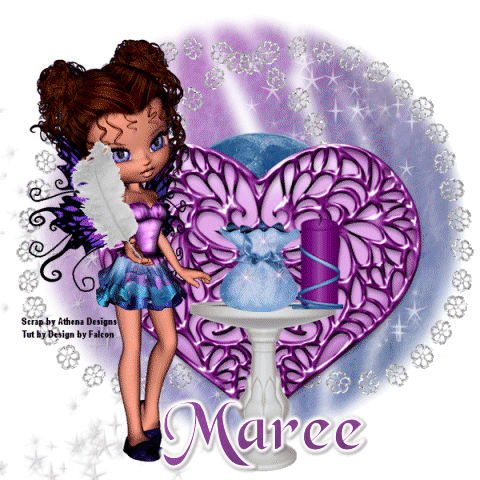
Supplies
Supplies
Let's begin
Open new image 600 x 600.
New layer select all copy paste Athena_paper5 select none,apply mask
then Image Free 90 degrees left.
Open Athena El32 copy paste resize move to the edge of mask
then duplicate Image Mirror.
Open Athena_El41 copy paste resize by 65 percent.
Select Ethena_El48 copy paste resize by 65 percent place in lower center of heart.
Select Athena_El 7 and 16 copy paste resize by 45 percent then place on top of font.
Select medi_thistleberry5 copy paste resize by 75 percent Image Mirror
place on left side of font.
Select Athena_El 12 copy paste resize by 75 percent move this layer under heart layer.
Select Athena_El22 copy paste resize by 50 percent place on tube hand
Using Black Chancey font type the word Myth in #ffffff repeat again
on new layer or Magic. X these 2 layers out for now.
Add your Artist © and your name.Now you can crop and save or continue for Animation.
This is only a guide and feel free to use any other element you wish.
Most of all have fun creating.
Animation.
1. In PSP click on Moon layer move this down so its about a third showing
then Edit Copy Special Copy Merged in AS paste as new animation.
2. Back in psp move moon so its showing half way
then repeat above this time Paste after current frame.
3. In Psp open Myth text layer move the Moon up 3/4 then copy paste special, then click into As
and paste after current frame.
4. Back in Psp x out the word then Edit copy paste special,
in AS paste after current frame 3 times.
5. Then in Psp open Or Magic layer copy paste.
6. Next frame lower moon back to 3/4 position don't forget to X out text layer
and copy paste into AS.
7. Repeat above but lower moon back to the 1/3 position.
8. Click on Frames 1,2,3 open the bling star(select all) copy paste 3 times
anywhere on bag. deselect.
9. Click on frames 4,5,6 open your cat bling copy paste into selection,
10.Click on frames 7,8,9 then using your bling star and paste onto bag 3 times.
11. Click on Animation then Frame properties and change this to 60.
This tutorial was written by Maree (aka Falcon) on 30June 2010
Any similarities to this tutorial are purely coincidental
© Maree
Subscribe to:
Posts (Atom)