
My Tutorials are strictly my own creations,
if they resemble another it is purely coincidence.
This was written with the use of PSP X3.
You may create it any version of PSP.
Supplies Needed.
I'm using the artwork of ©Suzzane Woolcott Currently available at Gorjuss Art Here.
Font of choice.
Mask_34 by Weescotslasscreations Here.
MurMisters-Copy
Xfeno2-constelllation.
Open new image 600 x 600 transparent background.
This is a large sized Mini kit and will need resizing of the elements.
Select your Floodfill tool background #ffffff and floodfill your background layer.
Open SCE Easte Paper3 copy paste as new layer apply mask.Duplicate then Merge do
wn.
Close out layer.
Open copy paste as new layer resize 20% then apply these settings us
ing MurMeisters
Copy.
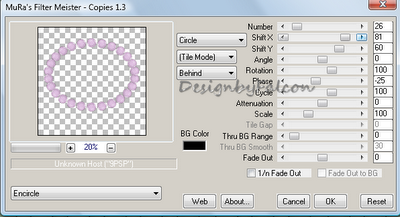
Click on Image to enlarge
Click Ok then apply light drop shadow 1/1/50/5.
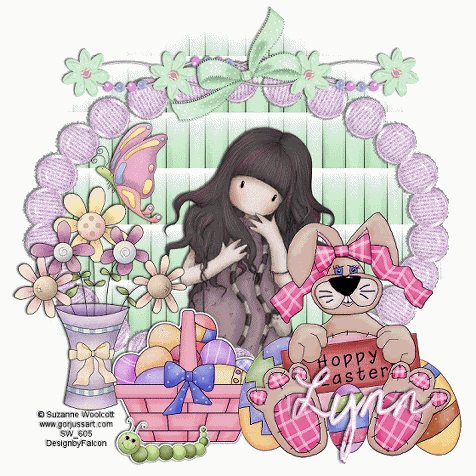
Open your tube of choice copy paste below oval layer.Resize if needed.Add drop shad
ow.
Open Flower vase copy paste as new layer resize 20% arrange o n left of layer add drop shadow.
Open Buterfly 1 copy paste as new layer resize 12% arrange above flower vase,
add drop shadow.
Open basket copy paste as new layer resize 12% arrange at bottom of oval frame
.
Add drop shadow.
Open Easter Bunny copy paste as new layer resize 15% arrange on right of layer,
add dropshadow.
Open Caterpilllar copy paste as new layer resize 12% arrange in front of basket give a light
drop shadow.
Open Beaded Flower Charm copy paste as new layer resize 40% arrange at top of oval frame.Adddrop shadow.
Open Bow2 copy paste as new layer resize 16% add to center of beaded flower charm
.
Add drop shadow..
Click on Oval layer and duplicate twice.
Then apply these settings using Constellation on layer 1.
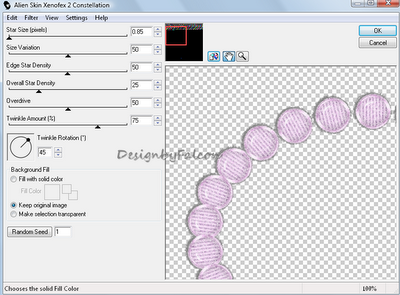
Click on Image to enlarge
Click on layer 2 apply same seting this time hit the Random button. Repeat for layer 3.
Feel free to use any other element you wish to use to create your ta
g.
Add your Artist © and your name.
Animation.
Open Animation shop then click back to Psp,
Make sure oval layers 2 and 3 are closed out.
Edit Copy Special Copy Merged click into AS paste as new animation.
Back in psp open oval layer 2 close out 1.Copy Special copy Merged click into AS Paste after
Current frame.
Repeat for oval layer. Check your animation and save as a Gif.
Thank you for trying my tutorial, I hope you enjoyed it.
I'd love to se your results so that I can show them on my Blog.
Tutorial by © Maree *(aka DesignbyFalcon) 22nd March 2012.

Here is Kaye result using my tutorial. Thanks Kaye