
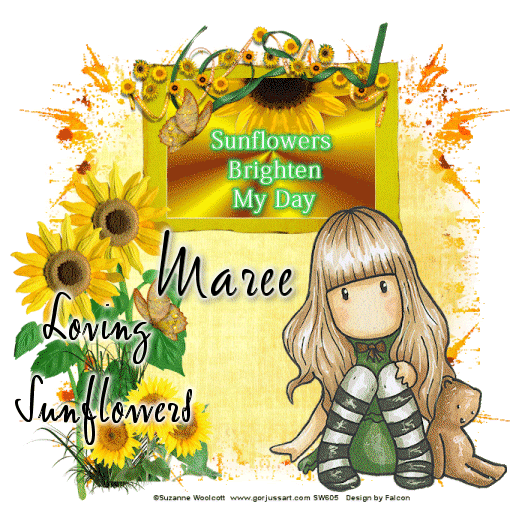
Scrap kit Loving Sunflowers by Rebbeca Here
Mask WSL_344 and WSL_351 Wee Scots Lass
PSP X2 or any version
Animations Shop
Drop Shadow of Choice
Remember to save often!!!
Lets Begin
Open new image 600 x 600.
Open Paper 7 copy paste apply mask wsl_344 merge merge group.Rename layer Mask 1.
Open Paper 3 copy paste apply mask wsl_351 merge merge group.Rename this layer Mask 2.
Open Sunflower2 copy paste then resize by 85 percent
Open Frame 2 copy paste resize place near top of layer.Click inside frame with Magic Wand then go to Selections Modify Expand by 3.
I used #ffff00 color and a gold gradient for effect
Use these setting or your choice:


Add the text I used or something of your own choice.
Open HalfSunflower copy paste resize Image flip and see tag for placement.
Open Flowerborder 3 copy paste resize then Image Free Rotate by 90 degree's Left. Place at top of frame. Give this a Drop Shadow of choice.
Open Tall Grass copy paste resize by 50 percent place bottom left side.
Open Sunflowers 5 copy paste duplicate on duplicated layer resize by 85 percent. Place around grass.
Open Sunflowers 7 copy paste resize by 55 percent place in fron of grass.
Add any other Elements you like.
Open your tube of choice copy paste see tag for placement. Add a Drop Shadow to the layers except mask layers.
Add your Artist © and your name.If you don't wish to Animate the tag then crop save as png.
Open Animation Shop.
Back to PSP. Copy copy merged, Click in AS and paste as New Animation.
Back to PSP.Click on the mask layer 2 lower the Opacity to 80 percent. Edit copy merge copy, click in AS paste after Current frame.
Back in PSP lower the Opacity to 50 percent copy copy merged, click on AS and paste after current frame.
Back into PSP, lower Opacity to 10 percent Copy copy merged. Click in AS and paste after current frame. You now should have four frames.
Click on Frame 3 copy paste after frame , repeat this again for Frames 2 then Frame 1. You now should have 7 frames.
Click on Animation then Frame Properties and change the number to 45, click Ok. Now view your animation and if you are happy then crop resize and save as a gif.
Thank you for trying my tutorial.
This tutorial was written by Maree (akaFalcon)on April 10, 2010.
Any similarities to this tutorial are purely coincidental.
© Maree 2010.